This is the second part of the Symantec Endpoint Protection integration with VMware view, in this part we will look at the implementation of the components described earlier. I am assuming that the Symantec Endpoint Protection Manager is already installed for monitoring/managing the environment.
Let’s revisit the basic concepts from Part 1, Symantec Endpoint Protection provides the following features to improve scan performance in virtual infrastructures:
- Network based Shared Insight Cache
- A Symantec Security Virtual Appliance that contains the vShield-enabled shared insight cache for VMware vShield infrastructures
- Virtual image exception tool
Architecture vShield and Symantec SVA 
Major Installation and configuration steps
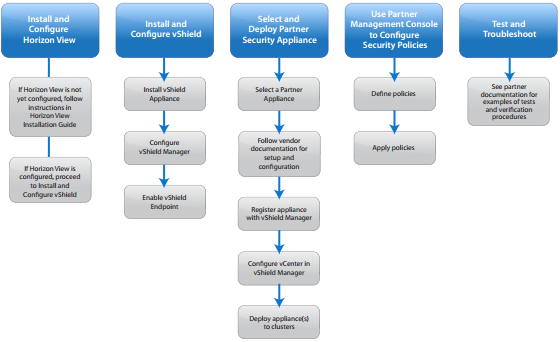 Below is the sequence in which we will go through about the installation
1) VMware vShield Manager
2) VMware vShield Endpoint
3) Symantec Virtual Appliance
Installation of vShield Manager:
The vShield Manager is the centralized network management component of vShield, and is installed as a virtual appliance on any ESX host in your vCenter Server environment. A vShield Manager can run on a different ESX host from your vShield agents.
Using the vShield Manager user interface or vSphere Client plug-in, administrators install, configure, and maintain vShield components. The vShield Manager user interface leverages the VMware Infrastructure SDK to display a copy of the vSphere Client inventory panel, and includes the Hosts, Clusters and Networks views.
The management interfaces of vShield components should be placed in a common network, such as the vSphere management network. The vShield Manager requires connectivity to the vCenter Server, ESXi host, vShield Endpoint module, and vShield Data Security virtual machine. vShield components can communicate over routed connections as well as different LANs.
It’s recommended that you install vShield Manager on a dedicated management cluster separate from the cluster(s) that vShield Manager manages. Each vShield Manager manages a single vCenter Server environment.
System Requirements Hardware/Software
| Memory | vShield Manager: 8GB allocated, 3GB reserved |
| Disk Space | vShield Manager: 60 GB |
| vCPU | vShield Manager: 2 |
For all software related dependencies please look at VMware Product Interoperability Matrix at
http://partnerweb.vmware.com/comp_guide/sim/interop_matrix.php.
Now let’s look at the installation/configuration procedure of vShield Manager
Step 1: Download the .ova file of vShield Manager from VMware download site, typically the naming convention is like VMware-vShield-Manager-5.x.x-<build_number>.ova
Step 2: Import the .ova file to an ESXi server through VI Client or Web Client
Step 3: Power on the appliance and configure as shown below. Login to the appliance using admin as username and default as password.
 Step 4: Once logged in type enable on the Manager> prompt , password is again “default” , once in you will have to invoke the setup as seen above.
Step 5: The setup prompt will ask you for networking details which enables you to access the vShield Manager Appliance.
Step 6: You access the vShield Manager user interface by opening a web browser window and navigating to the IP address of the vShield Manager’s management port.The default user account, admin, has global access to the vShield Manager. After initial login, you should change the default password of the admin user account.
Step 6: Once you are logged in the vShiled Manager’s web interface specify vCenter Server, DNS and NTP server, and Lookup server details.
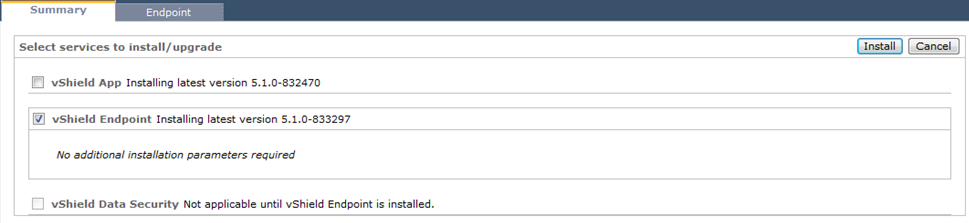
Installation of vShield End Point:
Step 1: Installation of vShield endpoint is very straight forward, login to the vShiled manager. Select any host on the left hand side where you want to install the vShield endpoint component.  Step 2 : The installation will begin and you will see messages like the one below.
 Step 3: You will see the below messages in the vCenter server
 The vShield Endpoint host component adds two firewall rules to the ESX host:
- The vShield-Endpoint-Mux rule opens ports 48651 to port 48666 for communication between the host component and partner security VMs.
- The vShield-Endpoint-Mux-Partners rule may be used by partners to install a host component. It is disabled by default.
Step 4: Once the installation is complete you will see the below messages in the vShield Manager

 The installation needs to be repeated for all the ESXi servers in the Datacenter.
Installation of Symantec Virtual Appliance:
The Symantec Endpoint Protection Security Virtual Appliance is a Linux-based virtual appliance that you install on a VMware ESX/ESXi server. The Security Virtual Appliance integrates with VMware’s vShield Endpoint. The Shared Insight Cache runs in the appliance and lets Windows-based Guest Virtual Machines (GVMs) share scan results. Identical files are trusted and therefore skipped across all of the GVMs on the ESX/ESXi host. Shared Insight Cache improves full scan performance by reducing disk I/O and CPU usage
The appliance is complete and ready to use as soon as you install it. The appliance includes the Shared Insight Cache.
Configuration steps:
Step 1:On the Symantec Endpoint Protection Tools product disc, locate the Virtualization\SecurityVirtualAppliance folder
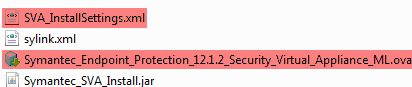
Step 2:Copy the entire contents of the SecurityVirtualAppliance folder to a local directory
Step 3:Download the file Endpoint Protection Security Virtual Appliance OVA file from File Connect at https://fileconnect.symantec.com, to the same folder
Step 4:Export Sylink.xml file from the SEPM to which you want to point the SVA and the VM Guest computers, to the same folder
Step 5:Edit the Sylink.xml file and add port details (HttpPort=”80”) to the file (as Highlighted in example below) to all instances of Server Address.

Step 6:Edit the configuration of the file SVA_InstallSettings.xml as per the details below:
a) vCenter Information : IP address, User Name & Password 
b) vShield Manager Information : IP address, User Name & Password
 c) Full Path to the Security Virtual Appliance OVA file (Ex: C:\SVA\SVA.OVA)
 d) ESXi Host Information : IP address of the ESXi host
 e) Full Path to the sylink.xml file (Ex: C:\SVA\sylink.xml)
 f) Datastore selection prompt
 g) SVA Hostname / username and password
 h) ip_address (a unique IP address for the SVA), gateway, subnet, dns
 Step 7: Copy the files (SVA_InstallSettings.xml, Symantec_SVA_Install.jar, Endpoint Protection Security Virtual Appliance OVA file & Sylink.xml to a folder on the VCenter server
Step 8: Ensure that VCenter server is installed with Java 7 or above
Installation
Step 1: From command prompt run the command:
a) Navigate to the folder where the SVA files reside
b) Type in the command: java -jar Symantec_SVA_Install.jar -s SVA_InstallSettings.xml
 c) Select the datastore for your Symantec Appliance, for networking select the appropriate switch or the port group which you have configure.
 d) You will see the below progress in the vCenter server when the appliance installations starts
 e) You will see the below messages once the installation is finished
 Step 2: After completion check if the SVA appears as an appliance and is in power on status , login to the vShield Manager and Select the Datacenter > Click on General > Hosts. You should see each hosts have a Service VMs listed that is your Symantec SVA appliance.
 Step 3: Check if the SVA is reporting to the SEPM from SEPM > Monitors > Security Virtual Appliance. The hostname should reflect the Symantec SVA name which you have given at the time of installation.
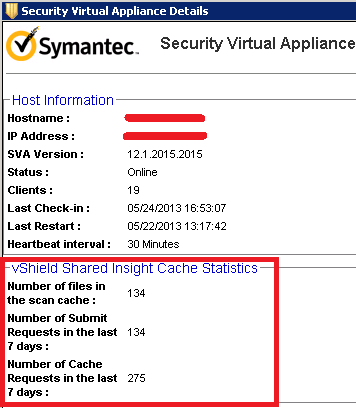
 Step 4: You can select the SVA and click on Details to know more information
 This completes the instillation of the Symantec SVA. In the next part I will focus on the configuration and the things that we have to do on the VDI master images as well as configurations which can be done on Symantec side. Stay tuned …

I wonder if you could enable RSS on your site? It would really help me monitor it better.
Thanks,
Michael
Added the required Social media and RSS feed for the blog. Due to the recent theme change they went missing. Thanks for reading.
Regards,
Samir
Thanks for adding the RSS!
Michael
Thanks for reminder 🙂
Pingback: Symantec Endpoint Protection Integration with VMware Horizon View – Part3
Where did you get the information about adding HttpPort=”80” to the sylink.xml file?
I have been trying to get this to work for the past week. We are testing using this with our all of our Virtual Servers. All of the clients were showing as unknown for SVA status in SEP Manager and the SVA appliances were not listed under the Security Virtual Appliance tab under monitors. I have an open ticket with Symantec but I found your link and added port 80 to the sylink.xml and now everything works. Thanks!
I don’t see that HttpPort= in the documentation.
I worked my way out for this , as you said it’s not there in Symantec Doc.
Awesome post….
Best post regarding SVA.
Good job…
Thanks Harry !!
Hi Samir,
I to followed your post . I found everything went on well but I cannot see the client in the Symantec Endpoint protection manager.
Could you please advice.
Harry
Thats strange it should work , are you able to ping the SEP Manager from the Client machine and vice versa that will be the first thing to check. Also check the firewall policies between the two and make sure all the required ports are open. Engage Symantec support if all is done right and still you are not able to get it working.
Hi ,
I’m able to ping .
Do yu suggest any specific port
to be checked with ?
But I do see the service Vms in the Vshield Manager.
Let me also double check the firewall and policy .
Harry
Hi Samir,
I checked with the Sylink file and teh firewall ports . But still no luck .
I do have other question , When I edit the VM i do see two network adapters are installed . Can you please explain how this works .
Harry
Harry,
Sorry for the late response, I just wanted to check if you still have the problem. Which VM you are referring with two network adaptors?
Thanks,
Samir
Awesome post Samir!!!!.
Rakesh
Hi,
Very informative post. i am planning to implement in similar way but we have already installed SEP clients on VM’s. do we have to uninstall SEP from all vm’s ?
This blog is now old and there have been changes in Symantec product. I suggest that you refer to Symantec docs for any guidance.