Creating an iSCSI Datastore on vSphere backed by Nutanix Acropolis Volumes API 

In NOS 4.1.3 release we added a whole bunch of new features in Nutanix platform , one of the noticeable feature in the release was the Acropolis Volume Management through APIs in tech preview.


What is it ?

The Acropolis Volumes API exposes back-end NDFS storage to guest operating system, physical hosts, and containers through iSCSI. This allows any operating system to access Nutanix DSF (Distributed Storage Fabric) and leverage it’s storage capabilities. In this deployment the Operating system is talking directly to Nutanix storage layer bypassing the hypervizor.


The following entities compose the volumes API:

  • Volume Group : iSCSI target and group of disk devices allowing for centralised management, snapshotting and policy application
  • Disks: Storage devices in the Volume Group (seen as LUNs for the iSCSI target)
  • Attachment : Allowing a specified initiator IQN access to the volume group
To use the Volumes API the following process is leveraged:
  1. Create a new Volume Group
  2. Add disk(s) to Volume Group
  3. Attach an initiator IQN to the Volume Group

How to use it ?

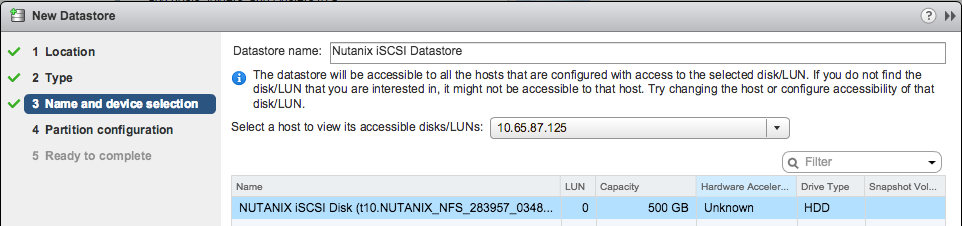
I am going to describe the process of using the Volumes API for provisioning a iSCSI datastore on vSphere. So, lets get down to it , there are other ways in which you can use the Volumes API such as presenting it directly to a bare metal or to a VM.

Steps on Nutanix Acropolis Layer

You need to connect (ssh) to the CVM of any Acropolis Hypervisor and open up the acli console , then first create your Volume Group.
Screenshot 2015-06-18 16.46.33
To verify the the Volume Group is created run vg.list command , the next step will be to create disks in a given Volume Group
Screenshot 2015-06-18 16.47.12
Before creating the disk you need to ensure that there is a Nutanix container already created in the system , to verify that and use a given container you can use the ncli command ( ncli container ls) on the CVM or you can find out the same through the PRISM interface. Below is an example of doing it through the command line.
Screenshot 2015-06-18 16.53.07
 You can see above that I have a container named “Container1” , I will be using this for creating my disks. In the below example I created a disk with 500GB in size on Container1 in volumegroup-2.
Screenshot 2015-06-18 16.58.54
Now I have a disk which I can use to present to a vSphere hosts as an iSCSI target , in order to to do so I need to attach an iSCSI Initiator IQN to this disk. So for that I need to go to my vSphere host and find out my IQN for the Software iSCSI initiator I am using on vSphere host.
Screenshot 2015-06-18 17.04.21
I will be using the above IQN to attach to my Volume Group which i created earlier on Acropolis with the below command.
<acropolis> vg.attach_external volumegroup-2 iqn.1998-01.com.vmware:NTNX-14SM36450087-B-65a05b59
Verify the Volume Groups setting and ensure that you are able to see the iqn number of the vSphere host used earlier.
Screenshot 2015-06-18 18.23.45
This completes the required three steps on the Acropolis side . Now in next section I am going to outline the steps that we need to take from vSphere side.
Steps on vSphere Layer

The first thing that you have to make sure is that your Software iSCSI adapter is enabled and all the required networking (vmkernel) interface is created for the SW iSCSI adaptor. Verify that the iSCSI adapter is now using this new vmkernel interface which we created earlier.

Screenshot 2015-06-18 17.22.34
Now it’s time to add iSCSI targets to the SW iSCSI adaptor , now in this case the target is going to be the CVM ip , add all the CVMs which are part of the Acropolis cluster for multipathing purposes.
Screenshot 2015-06-18 17.55.36
 Once the targets are added scan the vSphere host for the discovery of the new device.
Screenshot 2015-06-18 17.58.28
Confirm that you can see the newly added device and verify the multi-pathing
Screenshot 2015-06-18 18.00.34
Screenshot 2015-06-18 18.05.24Screenshot 2015-06-18 18.01.19
Above you can see that I have two disks/devices visible to the vSphere host and each have 3 paths for each of the CVMs we added as iSCSI target. Now it’s time to create a Datastore on the newly attached disk/device of 500 GB we created on Acropolis. Open the Add a Datastore Wizard and just follow the steps , below some example screenshots.
Screenshot 2015-06-18 18.06.23Screenshot 2015-06-18 18.07.07Screenshot 2015-06-18 18.07.19
Screenshot 2015-06-18 18.07.28
The above process creates a new Datastore called Nutanix iSCSI Datastore with a VMFS volume, now you can run your Virtual machines from it :-). The beauty of this solution is that your Storage is served from Nutanix DFS directly on a vSphere host without going through the Acropolis Hypervisor.

Summary :

As you can see it’s very simple to have Nutanix Acropolis Volume API being used as an iSCSI device on vSphere, there are other uses cases mentioned below where it will be extremely useful.

  • Shared Disks
    • Oracle RAC , Microsoft Failover Clustering etc
  • Disks as first-class entities
  • Guest-initiated iSCSI
    • Bare Metal consumers
    • MS exchange on vSphere using iSCSI
The Acropolis Volumes API feature is in tech preview with the NOS 4.1.3 release and can be used in a TEST/DEV environment , one can transition to a production environment once the feature becomes GA.
Note : The above use case with iSCSI mapping to ESXi is an experiment and is not a supported configuration on Nutanix. However the other use cases mentioned above is supported and can be used in a test/dev scenario with the tech-preview release and in production environments with a GA release.

2 Replies to “Creating an iSCSI Datastore on vSphere backed by Nutanix Acropolis Volumes API ”

  1. Pingback: Storage Portfolio Vendors want you to believe Silos are good » myvirtualcloud.net

Leave a Reply to Salman Siddiqi Cancel reply

Your email address will not be published. Required fields are marked *

*


four − = 2